Thursday, October 25, 2012

Lesson Theme: Pumpkins!

We've spent almost two weeks on a pumpkin theme!  

Here's a picture of a pumpkin patch we made from an egg carton.  We painted the outside orange, colored the bottom brown (for dirt), drew lines on each pumpkin with brown marker, and added a stick stem and pipe cleaner vine for each.  

We then wrote descriptive words about the outside of pumpkins on the outside of the pumpkin patch and descriptive words about the inside of pumpkins on the inside of the carton.


I also wrote some story prompts (each pumpkin related) and placed them inside the carton.  On certain days, Miss A would choose one and complete a story to go along with it.  


Here's a picture of our silly symmetrical pumpkin/jack-o-lantern patch.


To make these, we placed blobs of paint on ONE side of a folded paper near the fold, closed it, rubbed it, and opened it to find a symmetrical pumpkin design inside!  

After the orange part dried, we added black paint to one side (for an eye, part of a mouth and nose), closed it again, and opened it to find a CrAzY looking jack-o-lantern face each time!  :)


We visited a really fun pumpkin patch the first week of our theme, and the kids were allowed to each pick out a pumpkin.  They were quite pleased with said pumpkins which eventually led me to the idea of having a day of pumpkin contests (I picked up a pumpkin for my wonderful husband and I so we could participate as well).  


The contests were great for educational purposes - measurement, weighing, etc.  The results were recorded and the winning pumpkins were each awarded a gold medal/blue ribbon (found a package of winner medals at Walmart in the party section for about $1, and I just switched out the ribbons for blue ones) for each category won! 

If you do this - some other good categories would be number of seeds, cutest, most creatively decorated, best carving, most unique carving, etc.


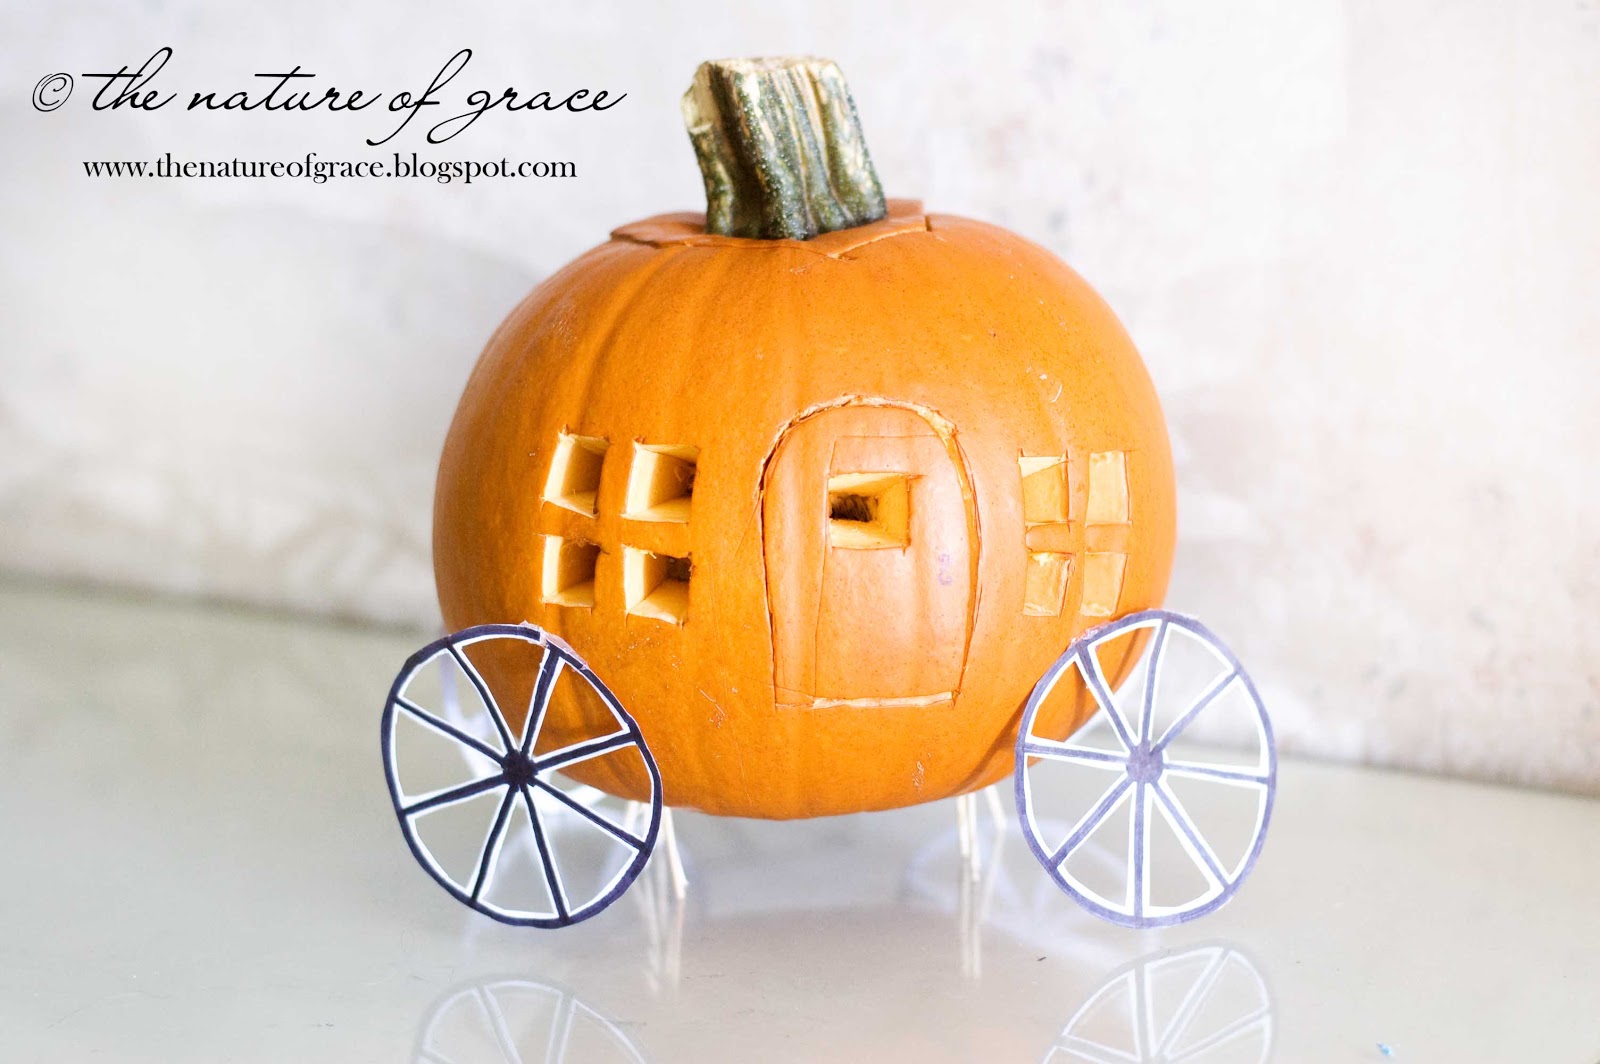
Speaking of carving... here is what one pumpkin ended up looking like this year!  I saw this first on this site and loved the idea of trying something a little different than a face (last year we made a little house which looked a lot like this without the wheels).  So my daughter and I decided this would be a cute idea and love the way it turned out (by the way, it is balancing on toothpicks stuck underneath).


This was a cute lacing idea I found here.  I decided to trace some pattern blocks onto black paper and let my kiddos practice making different funny faces on their jack-o-lantern plate.  Then they made a final choice and glued it down!


Jack-o-lantern math!  I decided these orange cups needed a face AND a stem!  I wrote number sentences on popsicle sticks (and colored the ends of the sticks a light brown).  The number sentences equal the number on the jack-o-lantern nose.  Then it was up to Miss A to match the number sentence "stem" to the correct jack-o-lantern (popsicle stick "stems" are inserted through a slit I cut in the bottom of the cups)!  

(BTW - the noses can be removed and changed so this activity can be completed more than once with a different set of number sentences.)


More pumpkin math!  Miss A came up with number sentences to equal the number of real pumpkin seeds found in each pumpkin.  


This was a Venn diagram we made.  It would have been neat to use real pumpkins but that could have become expensive so we used pictures instead.  We compared colors - orange, white(ish), and a mix.  :)


This was one of my favorite activities.  We melted orange crayon and poured it on a paper.  Miss A added seeds to make it look like a pumpkin that had SPLAT on the ground.  I added the bottom phrase "and the pumpkin went SPLAT!"  and then Miss A came up with several short stories which could end with that phrase.  

I typed out the stories as she dictated them.  I then printed the stories, cut them into strips and stapled them together.  Finally, I glued the whole thing to the top of the orange splat page so a person looking at it could flip through the stories and see how each one ended the same but the first part was always different.  I guess you could call it a Choose-Your-Own-Beginning story.  ;)

Linking up to:
www.sunscholars.com
www.kitchenfunwithmy3sons.blogspot.com
www.livinglifeintentionally.blogspot.com
www.christyscuties.blogspot.com
http://lookwhatwedid-homeschool.blogspot.com
www.cheeriosandlattes.com

Hip Homeschool Hop Button

Monday, October 15, 2012

Lesson Theme: Fall!

Taking my cue from kids and piles of leaves during the fall, I am just going to jump right in with we've been working on...


A quick lesson in pointillism.  Miss A worked on this over several days so as not to grow bored with it - pointillism can require a good deal of care and patience.  It was worth the wait - I LOVE how this turned out!

I'd also seen the cutest craft where the person used puzzle pieces for autumn leaves on a tree!  I decided to make our own version using a watercolor background and a branch heavy with leaves waiting for the first strong wind to send them tumbling to the ground.

We made three of these - examining how the changes in light during the day make the leaf colors appear slightly different depending on the time of day...


Here's a tree branch with autumn leaves in the full bright sun of the day...


Here's the same branch at sunset (notice the more muted yellow tone)...


And here is the branch at night - the yellow much darker...


Among the many different fall books available for reading is a treasure we read titled "Autumn: An Alphabet Acrostic".  I LOVE this book and highly recommend buying it (link below) or getting it from the library.  It is a book rich with the language and images of the season.

It was a challenge for us to make an acrostic of our own but we did!  Actually, Miss A did much of it, and I helped with harder letters like "U" where we looked up words that started with "U" and then chose one we could work with.  

After coming up with our own acrostic for the season, Miss A illustrated it (notice it is a fall NIGHT picture).


We also practiced our new spelling words!  Miss A would write a spelling word, count up the letters in that word, make up a math sentence to equal that number, show the math sentence using fall leaf cut-outs, and then write it out using numbers.


This was a sorting math sentences activity.  I wrote incomplete number sentences on leaves and placed them in a pile on the paper between the two baskets.  Miss A had to complete the sentences and sort the leaves into the appropriate baskets.


This was a whimsical bit of fall leaf yarn art.  I printed a picture of a leaf, taped wax paper over it and we worked together to dip yarn in a glue solution (mostly glue and a little bit of water to thin it out) and apply it to the outline of the leaf (sometimes having to add straight glue to make it stick better).

We also used yarn to add her initial to the center of the leaf.  Once dry, I pulled it off the wax paper (it was VERY stiff), and hung it up!  :)


Does this little wooden doll family look familiar?  They should since I posted about a photography and makeover session with them recently!  ;)

The Autumn family (as I named them), joined us for the week in a little bin full of colorful bits of fall!  Miss A and Mr. J have been enjoying them quite a bit!

BTW - this was incredibly INexpensive to make.  The apple trees are made from cut apart and painted paper towel rolls and construction paper.  The apples are red pom poms with velcro attached so they can be "picked" from the tree.  The baskets are cut up painted egg carton pieces.  The leaves are made from construction paper using a leaf punch I have.  The rakes are pieces of a thin cardboard box that I cut up and painted.  And the ground pieces are felt.  The dolls are available here and are very inexpensive as well!

So what fun fall activities have you been up to lately?


Linking up:
www.cornerstoneconfessions.com
www.momontimeout.com
www.handsonaswegrow.com
www.tatertotsandjello.com
www.sunscholars.com

Hip Homeschool Hop Button

Sunday, October 7, 2012

Meet the Autumn Family & a GIVEAWAY!

Every once in a while, I have the pleasure of photographing a family and preserving a memory!

 Meet my newest "clients" - Mr. and Mrs. Autumn and their five adorable children.  ;)


They were "referred" to me by Gemmie from gemmielou , and I am so glad they came my way!  They were so much fun to work with!


Here's mom and dad sneaking a kiss while the kids giggle in the background...


And here are the kids - with proud mom and dad looking on from a distance.

After our initial photo shoot - the Autumn family had a makeover...

And I was fortunate enough to be their photographer a second time, helping them showcase their new-found style and color!

Note:
The clothes are NOT painted on (with the exception of the boys' pants) but made from material I had left from another craft.  I thought it might be more fun to have the option of a change of clothes later on should Miss A wish to make some of her own outfits for them to wear.  

These clothes were sooooo simple to make.  I just measured and cut rectangles and then hot glued some very small pieces of velcro to both sides of the material so the clothes could be put on and taken off easily.  

I also cut little strips of felt for scarves and tied one around each doll to keep them toasty warm while we completed our photo shoot outdoors...

Here are those cute kids again!


And mom and dad sneaking another little moment together - look how in love they are!

Just the girls...


Just the boys...


A good portion of our photo shoot took place here in the Autumn family's backyard.  Lucky family - they even have their own apple tree!!!

I just love candids, so I snapped a few while they worked and played together...


A little good-natured wrestling in the leaves going on here...


I love this one of father and son working together...

The girls were busy as well, collecting some of their delicious red apples for cooking purposes later on.  Mrs. Autumn confided in me that she is a champion apple pie maker!  


It was fun spending part of a day with this amazing family, and I can't wait for them to meet my kids as well during our fall themed week!  (Actually, Miss A has already met them.  She discovered them before their makeovers were complete - and joyously began playing with them just as they were.)

I hope you've enjoyed these pictures from our fall photo shoot - every photographer should be so lucky to have such a great family to work with!  ;)

And now....the moment you've been waiting for....it's GIVEAWAY TIME!

Gemmie from gemmielou has generously offered to GIVE AWAY one more paintable wooden doll family to one very fortunate reader!  There are several ways to earn entries - just take a look below!

Can't wait that long to see if you've won?  You want your own wooden doll family RIGHT NOW?  

I understand - they are just that cute!  :)  Click on over to Gemmie's etsy shop now to view her amazing selection of wooden dolls!

They are so affordable you might just want to weep for joy as you realize the possibilities and pick up several more for friends, family, Christmas gifts (these would make the cutest stocking stuffers), birthday gifts,  party favors, etc.

And don't even get me started on the homeschooling ideas...tot school, multicultural units (decorate one doll to represent each country you study), a family theme, an All About Me unit, community helpers, etc.  See, I told you not to get me started.  ;)
a Rafflecopter giveaway

Linking up:
www.cleanandscentsible.blogspot.com

No Ordinary Blog Hop Hip Homeschool Hop Button

Wednesday, October 3, 2012

Lesson Theme: Apples!

Yay for APPLE theme week!  I love apples - there were so many fun things to do and taste this past week!

Here's the traditional taste-and-graph your favorites activity which we did with our family!  :)


We made apple prints and applesauce (NOT using the same apples).  We just combined our cut up apples with water and cinnamon and cooked them in a pan on the stove until they were ready to be mushed!

Once the apple prints dried, we used them to make an "applesauce" wreath - a simple reminder of our fun time cooking together!  Plus, what better way to be welcomed home than with the autumn scent of cinnamon as you walk through the door!

To make our wreath, I cut out the center of a round pizza cardboard (what a frozen pizza comes on).  We then glued our prints and cinnamon sticks to the cardboard.  A burlap and gold ribbon bow gave it the finishing touch!


We made pretend apple muffins as well.  I put a number in the bottom of each muffin tin and wrote number sentences on paper apples (then cut the apples up).

Miss A had to match the cut up apple math sentences with the number on the bottom of the tin (ex. 7+8=  15).  Then she wrote the number word that corresponded with the number on the bottom of the tin (ex.  four  for #4) on a muffin top and placed it on top of the cut up pieces inside the tin to complete each "muffin".


Spelling pies were another part of our week.  I deviated from our normal spelling words to come up with a list of words related to apples.  I then wrote the letters of each word on paper apples.

After reviewing our new words, I cut the apples apart, mixed them up, and let Miss A piece each word back together using the spelling list and/or her memory.  Once she could do that, we would glue it to the chart paper.  She then colored a pie picture and glued it partially on top so each pie could be lifted to peek at the apples inside.

During the course of the week, I would check to see if she could spell one of her words without looking.  If she could do so correctly, we would add some real cinnamon to the top of that particular pie to complete it!  :)


Speaking of pie, we just HAD to make apple pie to go along with some books we read.  :)
AND...

We made an apple pie bracelet!  We used some letter beads and wood beads painted red (for apples) to spell out the main ingredients we used to make our miniature apple pies (we made them in a muffin tin).  Not only is the bracelet cute and a reminder of our time together, it can be used as a great re-telling tool as well!


We practiced fractions using apples and the book "Apple Fractions".  I LOVE this book!  Not only is it informative, easy to read, and helpful - the illustrations themselves are adorable (little elves measure and slice apples to go along with the text).

If you are unable to find this book in your local library, Amazon has it (see the link below).


We also planned an apple bar to go along with dinner since I knew we would have so many apple slices left after dividing them up for our fraction lesson.  The bar was a hit with dipping choices of caramel, hot fudge, and peanut butter - yummm!


I also had a surprise up my sleeve for Miss A.  While she was busy working on something else one day, I set up "Snow White's Apple Farm" outside.  Miss A loves stories and fairytales so I thought it might be fun to incorporate one in our week - Snow White seemed the logical choice.

I blew up some red balloons to about the size of a large apple and stuck papers to the bottoms of each with a math sentence written on the paper.  I placed a sign in the yard welcoming her to Snow White's Apple Farm and let her know she needed to help Snow White pick some apples.  However, the wicked stepmother had hidden a bad apple in the bunch so she had to be extra careful not to place that in her basket by mistake.

I told her a number and let her loose upon the field of apples on the ground.  Her goal was to find the math sentences that matched/equaled the number - anything else was a poisonous apple.

She did a fantastic job of choosing all the right apples and placing the "poisoned" apple back on the ground!  I would have liked to play the game again another day, but unfortunately I found many of the apples deflated later on.  Perhaps it had something to do with a certain little someone finding the place where I had hidden them and emptying them out to play with.  Oh well - no doubt Snow White would have been understanding so I tried to be as well.   ;)

Meet the "Autumn" family and enter the GIVEAWAY here to win a cute wooden doll family of your very own!!!  Make sure you scroll through the giveaway post to see the before and after pictures of these fun dolls!  :)


Linking up to:
www.happyhourprojects.com
www.momontimeout.com
www.handsonaswegrow.com
www.cheeriosandlattes.com
www.tatertotsandjello.com
www.cleanandscentsible.blogspot.com
www.gingersnapcrafts.com
www.tipjunkie.com Hip Homeschool Hop Button